
Skill Level: Complete Beginner ⏱ Time: 45–60 minutes
📐 Sizes:
- 16″ × 16″ (41 cm × 41 cm)
1. Introduction
Have you ever looked at a cushion cover in a shop and thought, ‘I could make that’? Well, you absolutely can — and it is much easier than you might think! In this tutorial I will walk you through sewing a neat, professional-looking cushion cover with a concealed zip, start to finish, even if you have never touched a sewing machine before.
This pattern comes in three sizes: 16″ × 16″ (41 cm × 41 cm), 18″ × 18″ (46 cm × 46 cm) and 20″ × 20″ (51 cm × 51 cm). The back is made from two separate pieces with the zip neatly sandwiched in between — no basting, no fuss, and a beautifully clean finish every time.
If you can sew a straight line, you can sew this cushion cover. Let’s get started!
2. Pattern Pieces
This pattern has four pieces. All cutting measurements include a ½” (1.2 cm) seam allowance.
| Pattern Piece | 16″ × 16″ (41 × 41 cm) | Qty |
| FRONT PANEL | 17″ × 17″ (43 cm × 43 cm) | Cut 1 |
| BACK PANEL A (top 1/3) | 17″ x 5 3/4″ (43 cm x 14.6 cm) | Cut 1 |
| BACK PANEL B (bottom 2/3) | 17″ x 11 1/4″ (43 cm x 28.6 cm) | Cut 1 |
| ZIPPER FLAP | 17″ x 3 1/2″ (43 cm x 8.9 cm) | Cut 1 |
| ZIPPER TAB | 2″ x 1 1/2″ (5 cm x 4 cm) | Cut 2 |
| 📌 Note: BACK PANEL A (top piece) is one-third of the total back height minus 1/4″ (0.6 cm). BACK PANEL B (bottom piece) is two-thirds of the total back height minus 1/4″ (0.6 cm). The zip runs between them, positioned one-third from the top of the finished cushion. The 1/4″ (0.6 cm) is subtracted from each panel at the zip edge to accommodate the zip tape. The ZIPPER FLAP is cut once at the same width as the FRONT PANEL and folded to a finished height of 1 3/4″ (4.4 cm). The ZIPPER TAB size is the same for all three cushion sizes. |
3. What You’ll Need
Fabric
- Main fabric: medium-weight cotton, linen, canvas or cotton-linen blend (see cutting table above for yardage)
| 💡 Tip: Pre-wash and press your fabric before cutting to prevent shrinkage later. Buy an extra 5″ (13 cm) to allow for pre-washing. |
Zip — choose your size
| Cushion Size | Cutting Width | Zip Length |
| 16″ × 16″ (41 cm × 41 cm) | 17″ (43 cm) | 15″ (38 cm) |
| 📌 Note: The zip is 2″ (5 cm) shorter than the cutting width (not the finished size). The ZIPPER TABS you sew onto each end of the zip make up this difference, so the zip assembly spans the full width of the back panels when stitched into the side seams. |
Notions & Tools
- Matching thread
- Pins or wonder clips
- Seam ripper (just in case!)
- Sewing machine with a standard presser foot and a zip foot
- Rotary cutter or fabric scissors
- Ruler / tape measure — with both inches and cm
- Fabric marker or chalk
- Iron and ironing board
4. Before You Begin
Seam Allowance
All seam allowances are ½” (1.2 cm) throughout unless otherwise stated.
Prep Checklist
- Pre-wash and press all fabric
- Cut FRONT PANEL, BACK PANEL A, BACK PANEL B, ZIPPER FLAP (cut 1), and ZIPPER TABS to size (see table above)
- Check your zip is the correct length for your chosen size
- Wind a bobbin with matching thread and thread your machine
- Attach your standard presser foot to begin — you will switch to the zip foot in Step 3
Key Terms
- Seam allowance: ½” (1.2 cm) — the border of fabric between your stitching line and the cut edge.
- Right side (RS): The printed or ‘pretty’ side of the fabric — the side you want on the outside.
- Wrong side (WS): The back or plain side of the fabric.
- Topstitch: A visible row of stitching on the right side of the fabric, usually close to a seam or edge.
- Zip foot: A narrow presser foot that lets you stitch very close to the zip teeth.
5. Step-by-Step Instructions
The steps below are the same for all three sizes. Where measurements are given, the format is:
Small 16″ (41 cm) / Medium 18″ (46 cm) / Large 20″ (51 cm)
Step 1 — Prepare the Zipper
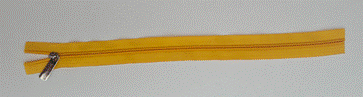
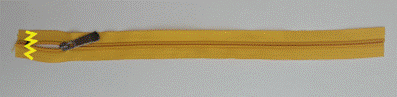
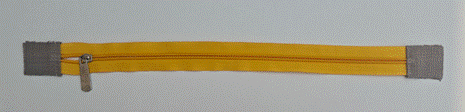
- Add the zipper pull to the zipper tape and close the open end of the zipper using a zig zag stitch, or sew it closed by hand from about 1/4″ (6 mm) from the open edge.
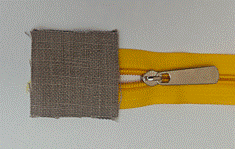
- Choose the correct zipper size from the table above for your chosen cushion size. Place the zipper tape between two ZIPPER TABS, aligning the ends of the tabs with the zipper end and the other edges of the tabs along the zipper tape. The right side of both tabs faces the zipper.
- Sew along the side edge with a 3/8″ (1 cm) seam allowance.
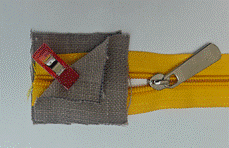
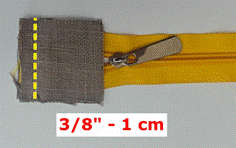
- Press both ZIPPER TABS away from the zipper so that they are wrong sides together.
- Topstitch along the edge of the tab with a 1/8″ (3 mm) seam allowance.
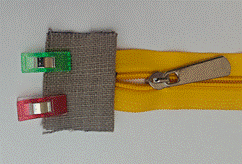
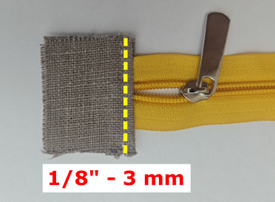
- Repeat steps 1–4 for the other side of the zipper tape.
- Trim off the excess of the ZIPPER TAB, taking the zipper tape as reference.
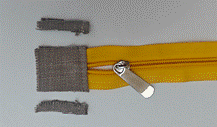
| 💡 Tip: Use a fabric that matches or complements your main fabric for the ZIPPER TABS — they will be just visible inside the side seams when the cushion cover is opened. |
Step 2 — Make the Zipper Flap
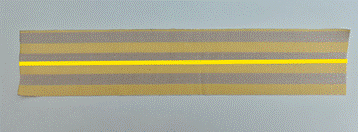
The ZIPPER FLAP is a single folded fabric piece that sits over the zip on the back of the cushion, hiding the zip teeth for a clean, professional finish.
- Draw a line along the long edge, through the centre on the wrong side of the ZIPPER FLAP.
- Fold and press towards the raw edge. The ZIPPER FLAP should now measure 1 3/4″ (4.4 cm) tall.
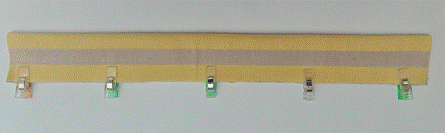
- Topstitch along both long folded edges with a 1/8″ (3 mm) seam allowance to secure the folds.
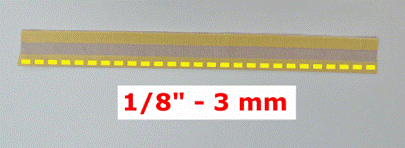
- Set the ZIPPER FLAP aside — it will be attached in the next step together with the zip.
| 💡 Tip: Use the same fabric as the back panels for an invisible flap, or a contrast fabric for a design detail. Press firmly so the folds lie completely flat before attaching. |
Step 3 — Attach the Zip to the Back Panels
The zip is stitched between BACK PANEL A and BACK PANEL B to create one complete back piece. The ZIPPER FLAP is sandwiched in at the same time, sitting behind BACK PANEL A so it folds down to cover the zip.
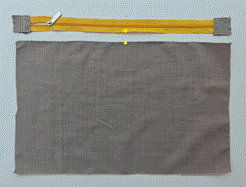
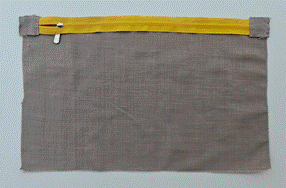
- Place the zipper face down (right side together) along the top edge of BACK PANEL B, aligning the raw edges.
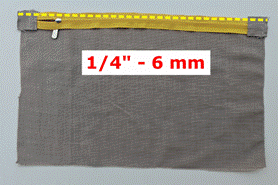
- Sew along the top edge with a 1/4″ (6 mm) seam allowance.
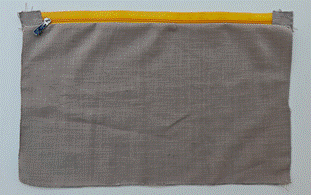
- Flip the zipper upward/back so it sits flat on the right side of the panel.
- Topstitch close to the folded edge at 1/8″ (3 mm) to secure it neatly.
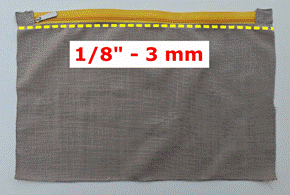
- Place the prepared ZIPPER FLAP upon the zipper tape, aligning it along the stitched edge.
- Sew the ZIPPER FLAP in place at 1/8″ (3 mm) — this sandwiches the flap securely behind the zipper.
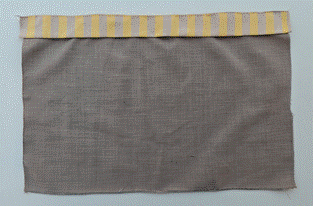
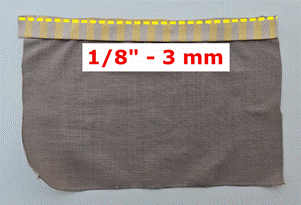
- Place Back Panel A face down (right side together) over the zipper, aligning the top raw edges — the ZIPPER FLAP is now sandwiched between BACK PANEL A and the zipper.
- Sew along the top edge with a 1/4″ (6 mm) seam allowance.
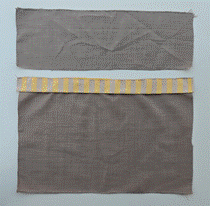
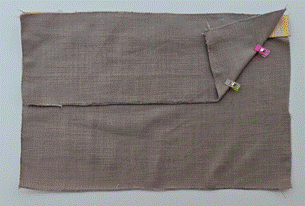
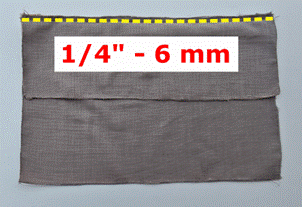
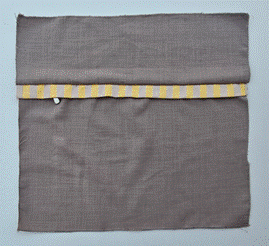
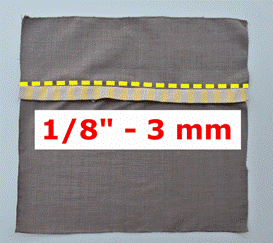
- Flip BACK PANEL A upward/back so both panels now sit wrong sides together with the zipper neatly enclosed between them.
- Topstitch along the top folded edge at 1/8″ (3 mm) to complete the back panel assembly.
| 💡 Tip: Before stitching close to the zip pull, stop with your needle down, lift the presser foot, slide the pull past, lower the foot and continue. This keeps your stitch line perfectly straight on both sides. |
Step 4 — Sew the Cushion Cover
- IMPORTANT: Open the zip halfway before the next step — you will need this gap to turn the cover right-side out!
- Place the FRONT PANEL and the assembled BACK PANEL right sides together. The zip will run horizontally one-third from the top of the back. Pin or clip around all four sides.
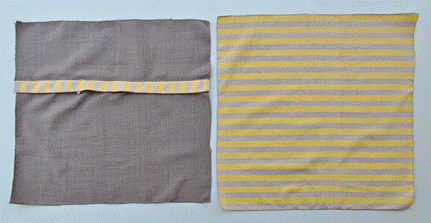
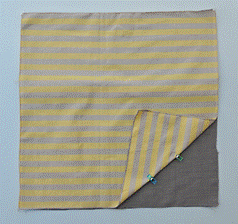
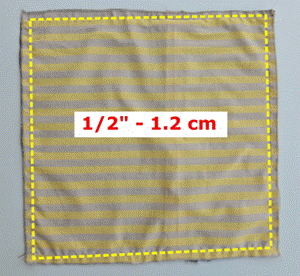
- Stitch around all four sides with a 1/2″ (1.2 cm) seam allowance. As you stitch across the short ends, make sure the ZIPPER TABS are caught in the seam — this is what gives the zip a clean, built-in finish.
- Trim the corners diagonally, cutting close to — but not through — the stitching to reduce bulk.
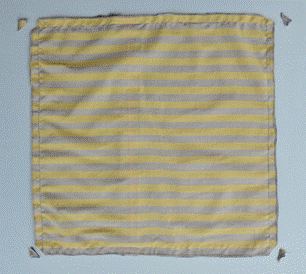
| 📌 Note: Cut each corner at 45 degrees, about 1/8″ (3 mm) from your stitch line. Sharp corners on the finished cushion depend on this step! |
Step 5 — Finishing
- Reach through the open zip and turn the cushion cover right-side out.
- Push the corners out gently using a blunt tool — a chopstick or knitting needle works perfectly.
- Press the entire cover well, paying special attention to the seams, the zip area, and the corners.
- Fold the ZIPPER FLAP over the zip on the back of the cushion and give it a final press so it lies flat.
- Insert your cushion pad through the zip opening and zip it closed. Done!
| 💡 Tip: For the crispest corners, press from the inside first, then from the outside. A little starch spray helps the fabric hold its shape beautifully. |
6. Pattern Details & Where to Buy
| Pattern Name | Zip Cushion Cover — 3 Sizes |
| Finished Sizes | 16″ × 16″ (41 cm × 41 cm) | 18″ × 18″ (46 cm × 46 cm) | 20″ × 20″ (51 cm × 51 cm) |
| Difficulty | Complete Beginner |
| Seam Allowance | ½” (1.2 cm) throughout |
| Pattern Pieces | FRONT PANEL, BACK PANEL A, BACK PANEL B, ZIPPER FLAP, ZIPPER TAB |
| Techniques | Straight stitch, zip insertion with tabs, topstitching, corner trimming |
| Buy the pattern | www.hemazingbags.com | Also on Sew Modern Bags |
7. FAQs
Q: Why is the zip shorter than the cushion width?
The zip itself is 2″ (5 cm) shorter than the cutting width. The two ZIPPER TABS — one sewn to each end — make up this difference. When the side seams are stitched, the tabs are caught inside the seam, so the zip runs the full width of the finished cushion from seam to seam. This gives a much neater finish than having the zip hardware sitting right at the seam edge.
Q: What fabric is best for the Zipper Tabs?
Use the same fabric as the main cushion cover for a seamless look, or a coordinating contrast fabric for a design detail. A scrap of sturdy woven cotton works well — avoid anything too bulky or stretchy. The tabs are trimmed flush with the zipper tape after stitching so excess bulk is removed.
Q: What fabric is best for the cushion cover itself?
Medium-weight woven fabrics such as cotton, linen, canvas or a cotton-linen blend work beautifully for all three sizes. Avoid very stretchy or very thin fabrics for your first attempt.
Q: Can I use a different seam allowance?
Yes! If you prefer a ⅝” (1.6 cm) seam allowance, add an extra ⅛” (3 mm) to all cutting measurements listed in the pattern pieces table. The method stays exactly the same.
Q: Can I make a size not listed here?
Yes! Measure your cushion insert, add 1″ (2.5 cm) to both dimensions for seam allowances, and cut your FRONT PANEL to those measurements. Cut BACK PANEL A to one-third of the cutting height minus 1/4″ (0.6 cm), and BACK PANEL B to two-thirds of the cutting height minus 1/4″ (0.6 cm) — both at the full cutting width. Use a zip 2″ (5 cm) shorter than the cutting width.
Q: I don’t have a zip foot. Can I still make this?
A zip foot gives a much neater finish and is strongly recommended for this method. Most machines come with one — check your accessories box. If you truly do not have one, stitch as close to the zip teeth as your standard foot allows.
8. Did You Make This?
I would love to see your finished cushion covers — especially if you made all three sizes! Share your makes on Instagram or Facebook and tag @.
Facebook: https://www.facebook.com/groups/hemazingbags
Instagram: https://www.instagram.com/hemazingpatterns/
Pinterest: https://in.pinterest.com/hemazingpatterns/
Website: https://hemazingbags.com/
Looking for your next sewing project? Check these out on Hemazing Patterns:
- Foldable Market Tote – https://hemazingbags.com/b/foldable-market-tote-bag
- Boxy Pouches – https://hemazingbags.com/b/boxy-pouch-sewing-tutorial
- Boxed Drawstring Bag – https://hemazingbags.com/b/drawstring-bag-sewing-pattern
- Vista Purse – https://hemazingbags.com/b/3Zhtx
- Monica Crossbody Bag – https://hemazingbags.com/b/monica-crossbody-bag-pattern
Never miss a new pattern or tutorial — sign up for the Hemazing Patterns newsletter at https://hemazingbags.com/
9. Pinterest Image
| 💡 Tip: Create a vertical graphic (1000 × 1500 px). Suggested text overlay: “Sew a Cushion Cover in 3 Sizes – Beginner Zipper Tutorial | hemazingbags.com“. Show all three cushions together for maximum impact. Schedule the pin to go live at the same time as this post. |
Pinterest: https://in.pinterest.com/hemazingpatterns/